Showing posts with label construction. Show all posts

Thursday, January 26, 2012

Regency Evening Gown 2012

As I mentioned in my previous post, I have some process shots of creating my dress for this year's Jane Austen Evening. My dress was inspired by this one from the exhibit Napoleon: The Empire of Fashion - I've drooled over the dress ever since I bought the catalog, and when I found some sheer striped fabric in the LA garment district I decided to give it a shot.

---------------------------------------------------------------------------------------------------

Inspiration

The below 3 images are found via Thomason Photography. I was happy to find this website, because the exhibit catalog doesn't show the sleeve clearly. I never found a photo of the back, so I just made it up based on my previous Regency dresses.


---------------------------------------------------------------------------------------------------

Draping


Earlier this year I bought my very first dress form, Beatrice, and she was a life saver for this project. I took all my measurements with my stays on, then put them on her, laced and padded her out to match. I draped the bodice directly on top and only had 2 fittings from start to finish, and honestly the bodice of this dress fits me better than anything else in my closet. 

I had 2 fabrics to work with, my base satin and the sheer striped fabric. First step was draping the satin underlayer - I wasn't sure exactly where I wanted the neckline, so I marked a couple options and picked one in my first fitting. I think(?) I picked the lower one.

I like to make notes on my muslins during draping or fitting, so that I remember what to do to the pattern. I decided to have drawstring closures at the neck and waistline, and because I wanted a slight gathered effect, I added a little extra to the CB of the pattern when I traced off my muslin.

I don't have a shot of the side view, but I kept the armhole really high, right under the armpit. High armholes are not the standard in today's clothing but they are crucial for good movement (especially in non-stretch fabrics!), and since I would be dancing in this dress I wanted to be able to lift my arms!

Next I draped my sheer striped fabric on top of my muslin. Luckily this fabric was not expensive, so I bought extra and decided to drape directly in the real fabric, and knew I could start over if I had too. As you can see, the bodice is bias like the original. Love directional stripes! (OK, all stripes are directional, but you know what I mean.)

 I don't even want to remember how long it took me to drape this darn bodice! Hours, literally. Getting all the tucks and poufiness placed correctly and flatteringly was really hard. I draped half, marked all the tucks, and then transfered it to the other side on the flat. The over layers of the bodice are flatlined to the satin.

---------------------------------------------------------------------------------------------------

Construction


The rest was fairly easy! So of course I didn't take process shots of it, grr. The neckline is finished with bias binding casing and trimmed with lace and a beaded trim, and I slipstitched the waistline seam allowance closed to create a casing. Here's the inside view of the front - yes, I overlocked the inside seam allowances!


For the skirt and sleeves, I used my modified Sense & Sensibility pattern from last year and just added the striped overskirt, which was a couple of rectangles with a bunch of box pleats. I did the CB placket wrong because the edges are supposed to butt up to each other, but my placket is for edges that overlap. Oh well, that's nothing a little hook and eye can't fix!

The Finished Dress!!

Whew! Thanks for indulging me that post, and congrats if you made it to the end! ;)

Thursday, March 10, 2011

70s does 30s Blouse - New and Improved!

As a swing dancer, I'm always on the lookout for vintage-y pieces that aren't precious real stuff. Silky blouses with flowy long sleeves are one of the hardest garments to find and are highly coveted among my friends. We get our inspiration from these dancers, among others:
Whitey's Hopper Maniacs, better known as Whitey's Lindy Hoppers

So every time I see a 70's necktie blouse with lovely gathered yokes, pintucks, bright colors and bold prints, I'm sad that it looks so darn 70's! They're affordable, sturdy, and cute. But the necktie just won't work.


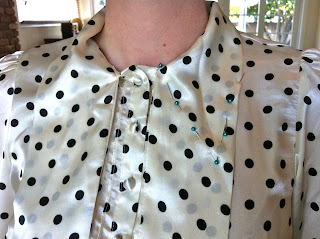
A couple weeks ago I needed a "shiny shirt" for a performance, and rather than risk wearing real vintage I pulled out this F21 blouse from the pile and attempted some Swing Era Transplant Surgery!

Here's the steps in case you want to try:

Put the blouse and mark the new collar. (My seamline is marked with the blue pins on the viewer's right.) Try it both buttoned up and unbuttoned. I went as wide & long as I thought I could get away with!


Mark your edgeline (where your pins were). If you're smart, use disappearing ink or chalk. I'm not smart and usually use a Sharpie cause it's handy, so I made tiny dots...hope you can see! Your lines should be more or less straight - no need to curve the collar tip.

Transfer markings to the opposite side.

Staystitch a line 1/8" inside your edge to stabilize the layers.

Carefully cut along your edgeline, and apply Fray-Check if needed.

Grab your trim, swap out the thread colors on the machine if needed (I changed to black on top and white in the bobbin), and apply trim along the entire collar edge to cover your raw edge.

If your trim is double sided (like rickrack) you can just fold it back at the corner instead of trying to turn the corner - it's a tight corner, so it's worth finding doublesided trim!

My project's a little messy, but that's not visible unless you're photographing it on macro. :)

Here's the finished product - I love how the contrasting trim highlights my new collar!

If you try this project, send me a link or a picture - I'd love to see!

Friday, January 21, 2011

A Dealer's Life

For me, the most fun talk at last weekend's symposium at LACMA was "A Dealer's Life: Conversation with Martin Kamer and Wolfgang Ruf". These were the two men who teamed up to build the collection that LACMA acquired, and together with Sharon Takeda, the senior curator of the Costume and Textiles Department, they told many interesting stories about their friendly rivalry and acquiring these pieces.

I managed to snatch a couple of burry photos from their Powerpoint presentation - there were a lot of behind the scenes shots that were a real treat.

This 1860's dress is featured in the exhibition to display the roller printing techniques that were newly developed. What didn't make the exhibition cut was the matching day bodice:
Exciting, right? Well, the audience thought so - there was an audible gasp when the picture flashed on the screen. Kamer also explained that this day bodice has hook and eye tape down the front, which is the earliest example he's seen of that. (Hope I got that info right - I was madly taking pictures and notes and probably didn't get everything right!)

Another crowd favorite is this dress from the 1830's:

Aren't those beret sleeves delish? Here's a couple more (fuzzy-wuzzy) shots from the screen.
Bottom and Interior Views

THE SLEEVE FOLDS FLAT!!! Pure genius.

It kind of reminds me of this, but the pink one is way cooler. :)


Thursday, December 30, 2010

Regency Gown #2

I've finished the bodice of my dress, which means that the whole thing is nearly done! The skirt is just a couple rectangles gathered into the bodice.

I lined the sleeves with my self fabric, and interlined with organza for extra poof. The right sleeve is misbehaving, I don't think I ironed it as well as the other side.

The bones still need to be cut - turns out the new dremel tool doesn't work on the bones, so we have to go to storage* and get the old dremel tool.
I'm really proud of the eyelets - I have an eyelet footplate attachment for my sewing machine, but they were still a lot of tedious work. I like the lacing much better than buttons though. Hope they hold up!
---------------------------------------------------------

*I'm not a fan of having a storage unit, and I'm hoping we can sell our house quickly so we can cram all that junk back in our closets! ;)

Sunday, December 26, 2010

Regency Gown #1

I hope everyone had a great Christmas weekend! We visited with family on Christmas Eve and Christmas Day, and in between I've been working on both Chris's coat and my Regency dress.

I'm using the same pattern I used last year, the Sense and Sensibility pattern. I don't love it, but I'm already familiar with it. As much as I didn't want to bother, I needed some pattern adjustments from last year's version (the bust was too short). I did a mockup out of lining fabric, since I don't have enough self fabric to recut if the pattern was wrong.

Ginger helps choose lining fabric.
Whew! Glad I did a mockup - I did need more corrections - the straps were falling off, it would have been a disaster! Lining/Mockup #2 is good, thank goodness!

I'm planning to do spiral lacing up the back, my first time trying it. (Why can't I keep anything simple?)
Here's my lacing inspiration, from the Kyoto Costume Institute:

And here's the fab how-to online resource I found for Spiral Lacing: The Zen of Spiral Lacing

I'm having Chris cut down some steel bones for me with the new Dremel tool he got for Christmas. Yay for new tools! Hopefully the dress will come together this week. Yay for short work weeks!
Related Posts Plugin for WordPress, Blogger...