Thursday, January 26, 2012

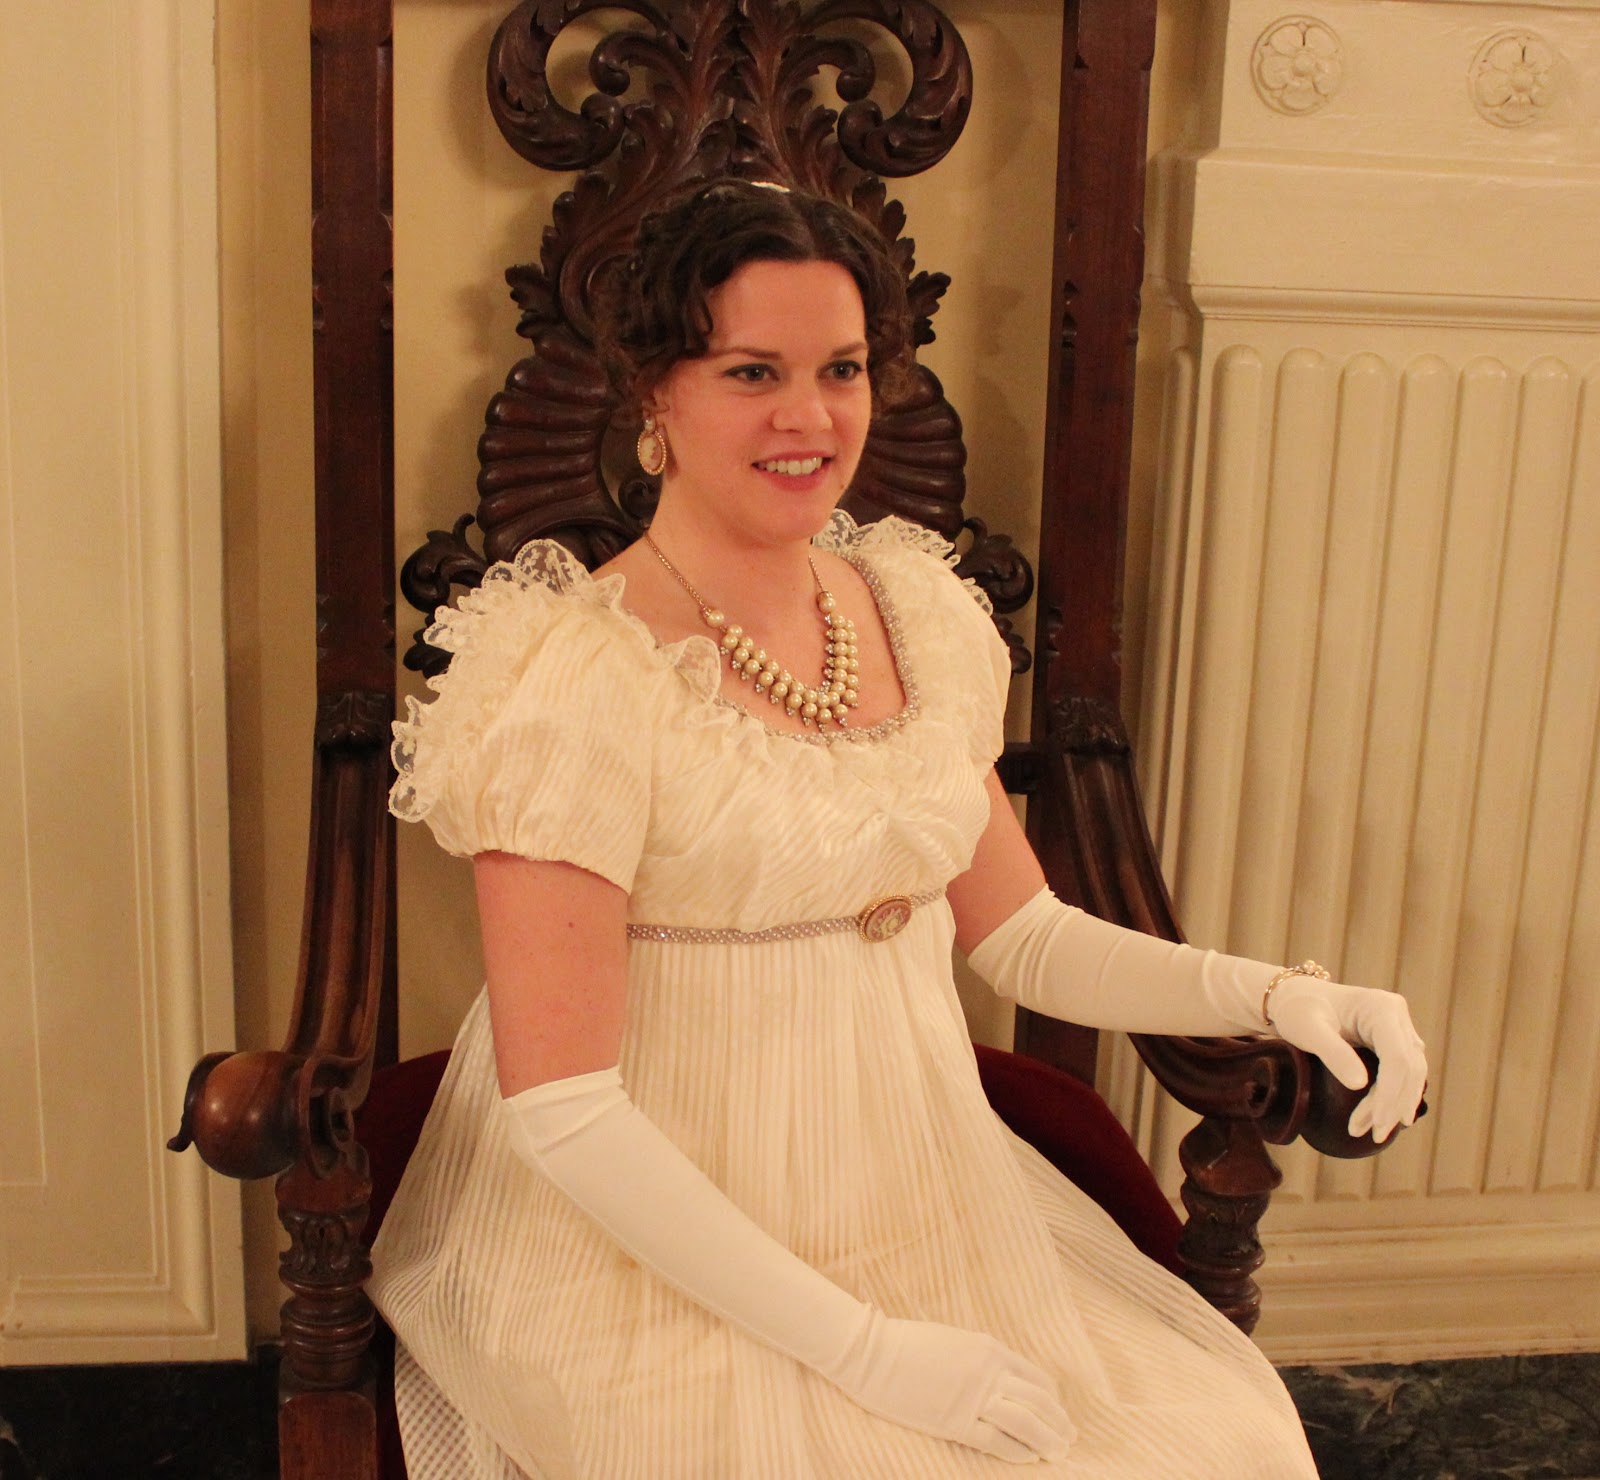
Regency Evening Gown 2012

As I mentioned in my previous post, I have some process shots of creating my dress for this year's Jane Austen Evening. My dress was inspired by this one from the exhibit Napoleon: The Empire of Fashion - I've drooled over the dress ever since I bought the catalog, and when I found some sheer striped fabric in the LA garment district I decided to give it a shot.

---------------------------------------------------------------------------------------------------

Inspiration

The below 3 images are found via Thomason Photography. I was happy to find this website, because the exhibit catalog doesn't show the sleeve clearly. I never found a photo of the back, so I just made it up based on my previous Regency dresses.


---------------------------------------------------------------------------------------------------

Draping


Earlier this year I bought my very first dress form, Beatrice, and she was a life saver for this project. I took all my measurements with my stays on, then put them on her, laced and padded her out to match. I draped the bodice directly on top and only had 2 fittings from start to finish, and honestly the bodice of this dress fits me better than anything else in my closet. 

I had 2 fabrics to work with, my base satin and the sheer striped fabric. First step was draping the satin underlayer - I wasn't sure exactly where I wanted the neckline, so I marked a couple options and picked one in my first fitting. I think(?) I picked the lower one.

I like to make notes on my muslins during draping or fitting, so that I remember what to do to the pattern. I decided to have drawstring closures at the neck and waistline, and because I wanted a slight gathered effect, I added a little extra to the CB of the pattern when I traced off my muslin.

I don't have a shot of the side view, but I kept the armhole really high, right under the armpit. High armholes are not the standard in today's clothing but they are crucial for good movement (especially in non-stretch fabrics!), and since I would be dancing in this dress I wanted to be able to lift my arms!

Next I draped my sheer striped fabric on top of my muslin. Luckily this fabric was not expensive, so I bought extra and decided to drape directly in the real fabric, and knew I could start over if I had too. As you can see, the bodice is bias like the original. Love directional stripes! (OK, all stripes are directional, but you know what I mean.)

 I don't even want to remember how long it took me to drape this darn bodice! Hours, literally. Getting all the tucks and poufiness placed correctly and flatteringly was really hard. I draped half, marked all the tucks, and then transfered it to the other side on the flat. The over layers of the bodice are flatlined to the satin.

---------------------------------------------------------------------------------------------------

Construction


The rest was fairly easy! So of course I didn't take process shots of it, grr. The neckline is finished with bias binding casing and trimmed with lace and a beaded trim, and I slipstitched the waistline seam allowance closed to create a casing. Here's the inside view of the front - yes, I overlocked the inside seam allowances!


For the skirt and sleeves, I used my modified Sense & Sensibility pattern from last year and just added the striped overskirt, which was a couple of rectangles with a bunch of box pleats. I did the CB placket wrong because the edges are supposed to butt up to each other, but my placket is for edges that overlap. Oh well, that's nothing a little hook and eye can't fix!

The Finished Dress!!

Whew! Thanks for indulging me that post, and congrats if you made it to the end! ;)

Tuesday, January 24, 2012

Jane Austen Evening 2012


This past Saturday Chris and I attended the 14th Annual Jane Austen Evening in Pasadena, CA. This is our 3rd time attending, and I think we have a better time every year! It's such a fun event - we see a few people regularly at other events, but lot of attendees we only see at the dance practices and the event, and then we all disappear for 11 months until the following January.

I got a fancy-pants camera for Christmas, and I'm still just learning how to use it (where's the zoom again?), and this was it's first official outing. Hopefully this means I'll have lots of fab pictures for you in the future!

This year we were greeted by the rabble protesting us 1% who are high-falutin' enough to attend a sumputous tea and ball...

Chris and I shared tea with Post-Captain Paul and his lovely partner, Kendra. 
(hope I got the rank correct! I'm hopeless about military things.)

Chris wore the same ensemble I made for him last year - I was hoping to make a pair of trousers for him this year, but didn't have enough time. That's why the photo is from the waist up. ;)

My dress was inspired by a gown from the exhibit Napoleon: The Empire of Fashion. I fell in love with this gown when I bought the exhibit catalog, and when I found the sheer striped fabric I knew I had to give it a try. It's not intended as an exact copy, but I guess it turned out pretty darn close - several people recognized it from the original, which was a pleasant and unexpected surprise!

I did take some process shots of creating my dress - I guess I should post those soon, right?

The hall filled with dancing.

Lauren looked amazing as always, and had a new turban and accessories to go with a dress from last year. I'm so glad she wore this dress for another outing, it's just stunning!

Beautiful lineup of costumers and their creations, including Katherine of The Fashionable Past, Loren of The Costumer's Closet, and Lauren of Wearing History. Chris saw our group of ladies lined up for a photo op and spied all the cameras sitting on a table, quickly grabbed all of them and started shooting. And who says that chivalry is dead? ;)

All in all, the Jane Austen Evening was a huge success, like always. It's growing more and more popular every year, and tickets sold out this year in less than a week! The date for next year is already set for January 26, 2013, and if you are interested in attending I recommend joining the email list and buying tickets as soon as they go on sale!

Friday, January 6, 2012

1939 Eagle Rock High School Yearbook

Happy New Year! I hope it's not too late to say that :) I've had some writer's block lately and haven't felt like saying much, but then yesterday I received an eBay package that I'm excited to share! I bought a 1939 yearbook from my high school in Eagle Rock, CA (northeast part of Los Angeles). When I was in high school I loved looking through the old yearbooks, and I'm thrilled to have one of my own.

Eagle Rock High School was opened in 1927 and was built in a traditional Spanish style, with tile roofs, arched doorways, and a courtyard. The original buildings were torn down in 1970 and rebuilt (due to earthquake safety standards, I believe), and unfortunately the "new" buildings weren't nearly as cute. The only original building still remaining is the auditorium.


The ERHS yearbook is called the Totem, as a tribute to the Native Americans who first settled the region. The yearbook still retains this name, I believe.


In this period, the school had 2 graduating classes per year - Winter and Summer. I think they combined the classes in the 40's? My yearbook has all the Winter classes/clubs/sports at the front, and Summer in the back.

The yearbook is dedicated to the burgeoning city of Los Angeles. It's fun to look at the pictures of our historical LA landmarks (Hollywood, Los Angeles City Hall, and Griffith Observatory) and think how they were so new back then. I guess they're still new by most architectural standards, but they feel old to us Angelenos!


Some snapshots of the old school - you can see the courtyard and classrooms, and I think tennis courts?

Winter Class 4-H Club. I think those are classrooms in the background?


This is one of my favorites - this club is standing in front of the auditorium, and you can see the class plaques out front. Every graduating class votes for a Class Name, designs a logo, and raises funds to have a plaque made for the front. It's nearly full out in front now! Next time I'm driving by the school I should take a picture - it's quite cool to see how the graphics changed over time.

Of course, there are loads of hair and clothing inspiration in this book, so I will be posting more. (did someone say Stripey Socks? They're all over!) After I finished scanning I found the book's original owner - Shirley Martin. She's quite cute and judging from the inscriptions she was quite popular with the boys!

Thursday, December 22, 2011

Regency Stays Part 2

My Mantua Maker stays are nearly done (finally! I did most of the work last spring, then left them unfinished for months!), and they're good enough to post about now.

Overall, I like this pattern - I recommend it with only slight reservations. It fits well and goes together easily, and has thorough instructions. My version is a new printing, so it's even been updated to increase the size of the back (a common complaint on internet reviews). Originally I was going to leave the length, but I did end up reducing it 1" because I'm shortwaisted.

But - the shoulder strap placement drove me NUTS. It's so wide in the back that they dug into the back of my arms, and constantly fell off. I scoured the internet for pics of these stays made up, and every picture I saw has the same issue, so I decided to just go with it - no one else seems to complain, so maybe I should just shut up and deal.

Then I went to see the Fabulous! exhibit at FIDM, and they had a pair of regency stays on display. The straps on these stays were much closer together in the back, but still sat wide at the shoulder and at the front. The shape reminded me of a racer-back tank, though less severe.

I did more internet research of extant stays, and over and over I kept seeing the same thing -
the way these stays from the MFA are displayed show this concept - see how they're narrow in the back and wrap around the shoulder to be wide in the front? Seemed like it would solve the strap-falling-off problem.


So even though my stays were all but finished, I just wouldn't be happy if I didn't try to fix them.
Here's how I tried my new racer-back concept - remember, my stays were basically finished, so I had to get a little creative to attach the new straps. I had even done the binding at the top and had to remove that. ARGHH!!! :)

I put the stays on Beatrice, and tossed last year's Jane Austen Evening dress on top and marked the neckline with pins to use as a guide for how wide to set the straps. 
I kept the shoulder strap on grain, and wrapped it from back to front. It's basically just a rectangle with a little flare at the back seam. The angle of the strap at the seam is the important part to get right.


Shoulder strap trimmed down.


This side view shows how the original strap placement in the Mantua Maker pattern is under my armpit. No wonder they're so uncomfortable!

New strap placement.

Here's the finished version, on my properly padded form - they are much more comfortable, don't fall off as easily, and hopefully are still wide enough for a nice evening neckline! My new straps are slightly too long now because the stays were sitting too low on Beatrice when I "draped" the strap, but oh well. Adding another hole won't make a big difference to these frankensteined straps!


(As previously mentioned, I did choose to do cross-lacing instead of the period-correct spiral lacing at the back. Without a maid, it's just too hard to lace up a spiral-back-lacing corset!)


Related Posts Plugin for WordPress, Blogger...