Showing posts with label jitterbug fashion. Show all posts

Wednesday, February 27, 2013

Floweruary the Last

I knew this already, but I'm REALLY bad at daily challenges. :) I kept up Floweruary until the middle of this month, but I realized I'm not a very flowery girl, and I felt weird taking photos of repeats. Oops! So here's the final installment - maybe I'll stock up on flowers before next February (but probably not).


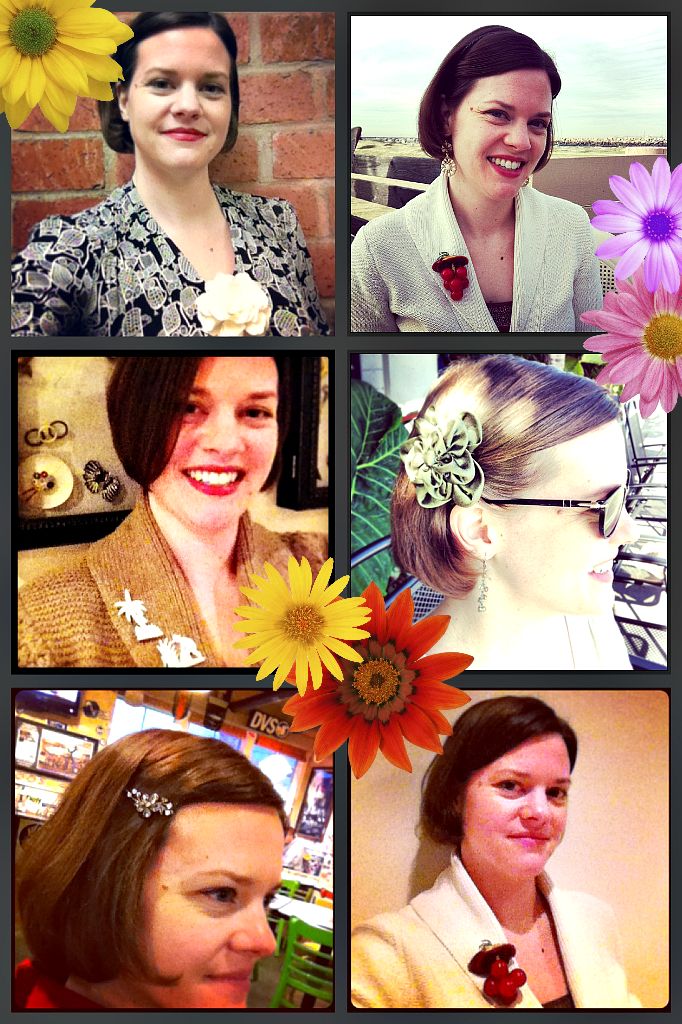
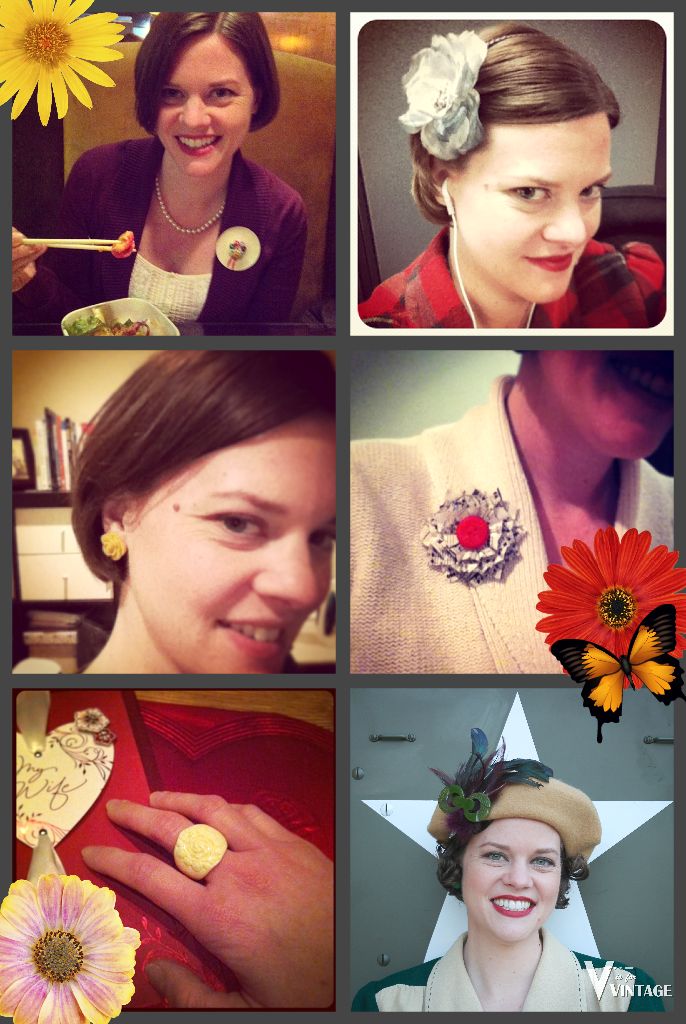
Clockwise from Top Left:

Floweruary 8th - tiny flowers on a hat pin. And sushi.

Floweruary 9th - listening to a book while Chris is at work. Then off for some dancing!

Floweruary 13th

Floweruary 16th - Air Raid!

Floweruary 14th - Valentine Candy and a fake Ivory rose ring

Floweruary 11th - Yellow Fakelite Rose Earrings


Follow my blog with Bloglovin

Thursday, February 7, 2013

Floweruary 1st-6th

I'm participating in Floweruary this year, the daily challenge to wear and post a photo of a flower. I've taken a little liberty with the challenge and expanded it to a few different types of vegetation. ;) I was going strong with the challenge until today, but I plan on getting back on the wagon tomorrow!

Clockwise from Top Left: 
Floweruary 1st — at Rusty's Rhythm Club
Floweruary 2nd - Breakfast at the Beach. Cherries started as flowers, so I'm calling it good.
Floweruary 3rd - At the Car Wash
Floweruary 4th - Monday was a repeat of Saturday, but with less enthusiasm.
Floweruary 5th - little hair requires a little barrette.
Floweruary 6th - palm tree and a fresh hair cut. 
These pins live in that empty spot behind me most of the time.

Saturday, November 17, 2012

Everyday Wardrobe: Gray Tweeds

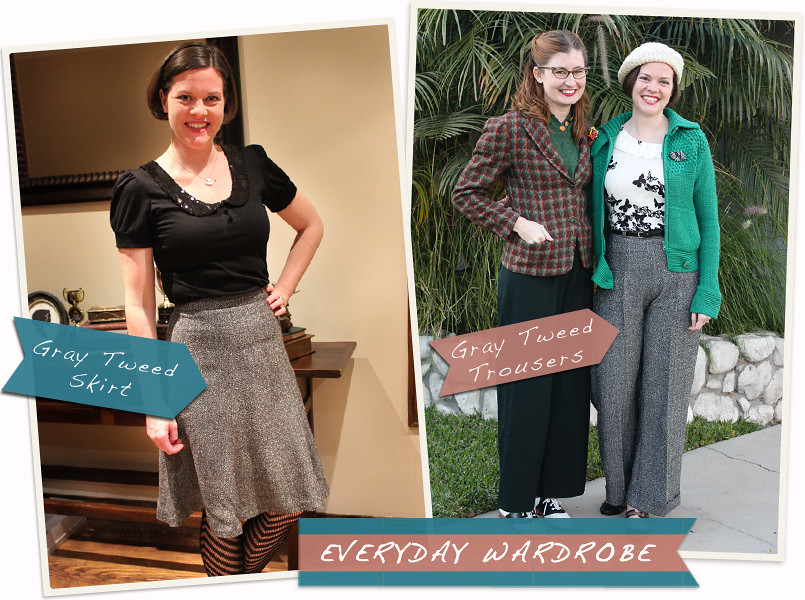
There has been some buzz lately on sewing blogs about the Everyday Wardrobe - we all have a tendency to sew/buy a lot of special pieces that aren't very versatile, and wind up wearing the same few things all the time. This topic came up right when I decided to put some fresh effort into my dance wardrobe, and I'm incorporating the idea into my current projects.

I've got 2 patterns that I plan to use over and over for my Everyday dance pieces...my dance skirt is a 6-gore style that I copied from a thrifted skirt, and the trousers pattern is Wearing History's Smooth Sailing pattern. My genius idea is that using TNT* patterns & and the same fabric means that the sewing will go quickly. Except it's not so genius when my fabric is off-grain when I cut them out, because then it means I have 2 garments to fiddle with and fix instead of one! whoops...

Here are my first additions to my Everyday (Dance) Wardrobe - my 2 TNT patterns stitched up in an gray acrylic tweed. I love using washable fabrics, so I'll pick a good synthetic/blend if it looks nice. This one really looks like wool and it's a loose weave so I think it'll still breathe.

I didn't plan my new tweed pieces around Sunni's idea of making an outfit from a Never Worn Garment in your closet, but that ended up happening! I've had that white butterfly top for nearly 2 years, and wore it for the first time this weekend.

What do you think about the Everyday Wardrobe idea? Are you joining in? or would you rather put your efforts into making fancier things?
--------------------
TNT Pattern = Tried and true pattern that you've made before and love!

Tuesday, June 12, 2012

Another Maharaja Costume

Since we're talking Majaraja costumes, I thought I'd share one I made for myself a few years ago. (oh, no, I just checked and it was in 2008...that was a long time ago already!!)

The Friday night theme at Camp Hollywood was Maharaja -- Chris wore a tuxedo (inspired by Hal), and I made a "1940's does Arabian Nights" playsuit - you know, like how all the costumes in period movies of the 30's & 40's look more like contemporary fashions with only a slight nod to the past. That's what I was going for.

Again, this is a rayon fabric for good swish. The skirt is a long panel that's gathered with box pleats into the waistband, and I put butterfly sleeves on the top for ease of movement.

These photos are from the Amateur Balboa contest - we got first place that year. It was also probably the best hair day of my entire life, and I like to think that had a little to do with winning. ;)


Monday, June 11, 2012

Maharaja Costume

A few months ago, Balboa & Lindy Hop champion Laura Keat contacted me to ask if I would be interested in making a costume for a new routine she was working on. As a rule I don't sew for other people (I don't even hem Chris's pants, he has to take them to the cleaners), but this was a special project that I was very interested in working on.

On Saturday night at All Balboa Weekend, Laura and her dance partner, Jeremy Otth, performed Hal & Betty Takier's "Maharaja", a musical short from 1943. This is one of only a few clips we have of LA Swing from the 30's & 40's, and this one is a wild ride - the energy and enthusiasm combined with their street dance technique has been hugely influential to modern balboa dancers. In honor of Hal's recent passing, Jeremy & Laura wanted to represent this in their recreation.

Inspiration: 40's Playsuit

Inspiration: High-flying skirt!

I worked with Laura to create a 40's playsuit like the one Betty wears in Maharaja - unfortunately most of the footage we have is pretty blown out and details are hard to see, but that gave us some creative license in the design. For the top and the skirt I used a rayon twill, lined with a rayon satin (I've got a bit of a love affair with the drape and flow of rayon - perfect for swishy skirts!)


I draped the top and the skirt, and we decided to put buttons down the skirt so that it can fly open for this routine but be not as...revealing for others. :)

Cute, right? Well, get ready to be wowed - they NAILED the routine! Bummed I couldn't be at the event in person, but so glad I got to be part of it anyway!

Jeremy Otth & Laura Keat perform Hal & Betty Takier's "Maharaja" in tribute at the 2012 All Balboa Weekend


Photo by Shannon Sheldon

Photo by Shannon Sheldon

Saturday, June 9, 2012

Jitterbug Jewelry

I was messing around with searching LIFE Magazine via Google the other night and found these photos and little letter about "Jitterbug Jewelry" - rhinestone encrusted brooches of dancing instruments. I would die if I found a set of these! Just too too cute.

And a note about the highlighting below - when searching for vintage info about swing dancing, I find that "jitterbug" is the best search term. The music was "swing", the dances were individually known as "Lindy Hop" "Balboa" and "Shag" but collectively called "jitterbug", and a dancer was always just a "jitterbug". Not sure when terms like "swing dancing" and "lindy hopper" started being used, but I'm guessing around the 70's & 80's - so those terms commonly used today aren't very useful for searching older references.

Jitterbug Jewelry, as featured in LIFE magazine, May 16, 1938

Monday, February 13, 2012

Dyeing Aris Allen Oxfords

This week is one of my favorite events of the year, but unfortunately I don't think Hallmark will ever make a card in honor of the Great Los Angeles Air Raid of 1942.

The Air Raid is held at Ft. Macarthur in San Pedro, and is primarily outdoors and unpaved. Last year was rainy, but we've been having a mild winter this year so I hope the weather holds through the weekend! Even if the ground isn't muddy it'll still be dirty, so I want some warm sturdy shoes to wear. Last year I wore my Aris Allen oxfords and they got nice and muddy, and last weekend I finally got around to dyeing them, which I've wanted to try for a long time.

This isn't exactly a tutorial on how to dye these shoes because I feel that this technique can be improved on, but in case some gals want to dye theirs I thought I'd document what I did. If you have any ideas how to improve this process, please comment below! And if you haven't seen it, read the Dreamstress's Shoe Dyeing Tutorial.


Supplies:
Dye - I chose Dylon, RIT would probably work fine
Salt - this may or may not be a good idea, see below
Gloves - get a 5 pack, I used at least 3 pairs
Brush - I chose a cheap sponge version, it worked fine
Old toothbrush - to clean shoes
White Tissue paper - stuff inside shoes while dyeing
Not shown: 
Bowl for dye (glass or stainless steel)
Spoon for mixing dye (do not use for food)
Paper towels!

Using a toothbrush or something similar, clean your shoes. Mine still had lots of mud from last year, and you need to clean off all the junk so the dye can take evenly.

I mixed up the dye according to the package instructions, but they wanted me to add salt to the dyebath water. Since I painted my shoes, I added it to the dye - which I'm not sure was a good move...

I didn't tape off any trim, but if you want to, do that now.
Stuff the shoes with tissue paper or paper towels.
Using the brush, thoroughly wet the shoes with plain water, then apply the dye. It's like watercolor painting, wet-on-wet. It spreads fast and goes on fairly evenly.

Wet shoes, after one coat. I let them dry for a while, then did a second coat.

After drying, the shoes were really splotchy! I'm not sure if it was from the dye or the salt, but it brushed away. I had already pitched the toothbrush, which was the wrong tool for the job anyway, so Chris got me a soft bristle brush from his shoe polishing kit.

 Shoe Brush.

Ahh, much better! not perfect, but good enough. They are more even-toned in real life.

Here's a warning about this project. The velvet nap seems like it's made of cotton, which is a natural fiber and dyes well with Dylon or RIT. The stitching and binding are synthetic and doesn't pick up the dye for natural fibers well, which is why you get the neat contrast. BUT!! it looks like under the cotton nap is a synthetic base, so the areas that are rubbed down through wearing don't take the dye well either.

If you really want to dye well worn shoes, I'd recommend mixing together dyes that are intended for natural and synthetic fibers. But then you'll loose the contrast stitching because that will dye too. Another option is to use a lighter shade of dye so the contrast won't be as strong.

FYI, I never wore these shoes much, maybe out dancing 5 times? That was enough to wear down the nap, I guess.

I'm still really happy with how they turned out! I like them in brown MUCH more than the off-white from before, and the contrast stitching is so cool. Most of the uneven color is on the inside of the shoes so it's not obvious, and I'm not above touching them up with a marker. :) Now I just need to find the Scotchgard and spray them down!

Tuesday, November 8, 2011

HEIDI ROSENAU: vintage dancer, in 13 acts

Over the past week or so, my friend and fellow swing dancer Heidi Rosenau in New York has been the subject of a 13-day blog feature at TheChicIndex.com. She dresses in exquisite head-to-toe vintage daily, and shares some of her favorite outfits and the stories behind them. It's fascinating and inspirational! 

Here are a couple of my favorite outfits so far, click over to the blog for more info and to see the rest. I can't wait to see what she has lined up for the rest of the week!


Tuesday, July 26, 2011

CH 2011 - "A Day at the Races" Outfit

I only made one new outfit for Camp Hollywood this year, for Friday night. The theme was A Day at the Races but it was also the night of the Balboa contest finals, so I didn't want to be too "theme-y". I decided to wear some 30's daywear but was still undecided as to exactly WHAT -  until Kate posted some Summer Inspiration from 1938. The Sunback Dress (4th picture down, #7754) caught my eye and I knew that was the way to go.

I have a similar sundress pattern that I've made several times, so I grabbed that and headed to Jo-Ann's - and actually found some cream rayon herringbone there! Miracles do happen. The striped fabric was hiding in the upholstery section, but it softened up after washing.


Sundress
Hollywood Pattern #1788 - c. 1939
Bolero
Simplicity #2762 -  c. 1938


And here's an action shot - the belt kept spinning around all night - I think I need a well-placed snap.
Doesn't rayon just move the best though? :)

Photo by Alex Vasallo

And last but not least, here's a video of the Balboa contest finals. Can't leave that out, I guess!

Camp Hollywood 2011 - Balboa Finals
Video by Sandra Carranza

Monday, July 25, 2011

Camp Hollywood 2011 - Balboa

This past weekend was the 14th annual Camp Hollywood, and as usual we packed up the car and drove 20 minutes to the LAX Marriott hotel for our "big" summer getaway. Hey, a couple days off work? I'll take it.

Out of all the swing dance weekend camps, Camp Hollywood is particularly dear to me. Not only is it the biggest swing event in the region, and is kind of a "family reunion" with longtime friends whom we don't get to see much, but it's also the camp where I first learned sugar pushes and swivels, took my first Balboa lesson, and saw Groovie Movie and Buck Privates for the first time. Way back in 1998, when I was a senior in high school. Without a doubt, that weekend changed my life.

This year Chris and I competed in Balboa, and won 2nd place (congrats to Jacob and Valerie for beating us again! ;) We were watching footage this morning at 4am when we got home, and I was particularly excited about how we danced in the prelims - I couldn't remember much about this dance after it happened, so I was surprised at how much I like it! 

Camp Hollywood 2011 Balboa Prelims
(I'm unfortunately blanking on the name of the guy who filmed and was awesome enough to pass us a copy)

And for those who are wondering, I'm wearing the trousers I made from Wearing History 30's Trousers pattern (blogged about here). I got so many compliments on them that I must make more soon! 

Monday, April 11, 2011

6 A.M. Swing Party - Rendezvous Ballroom

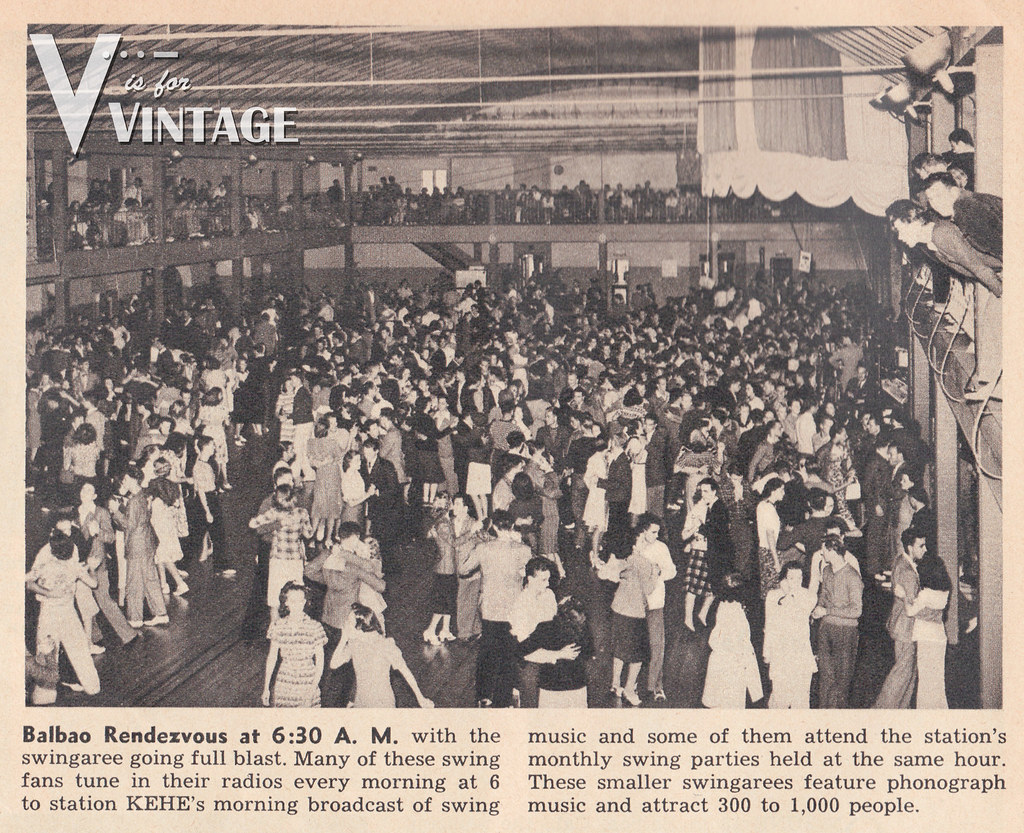
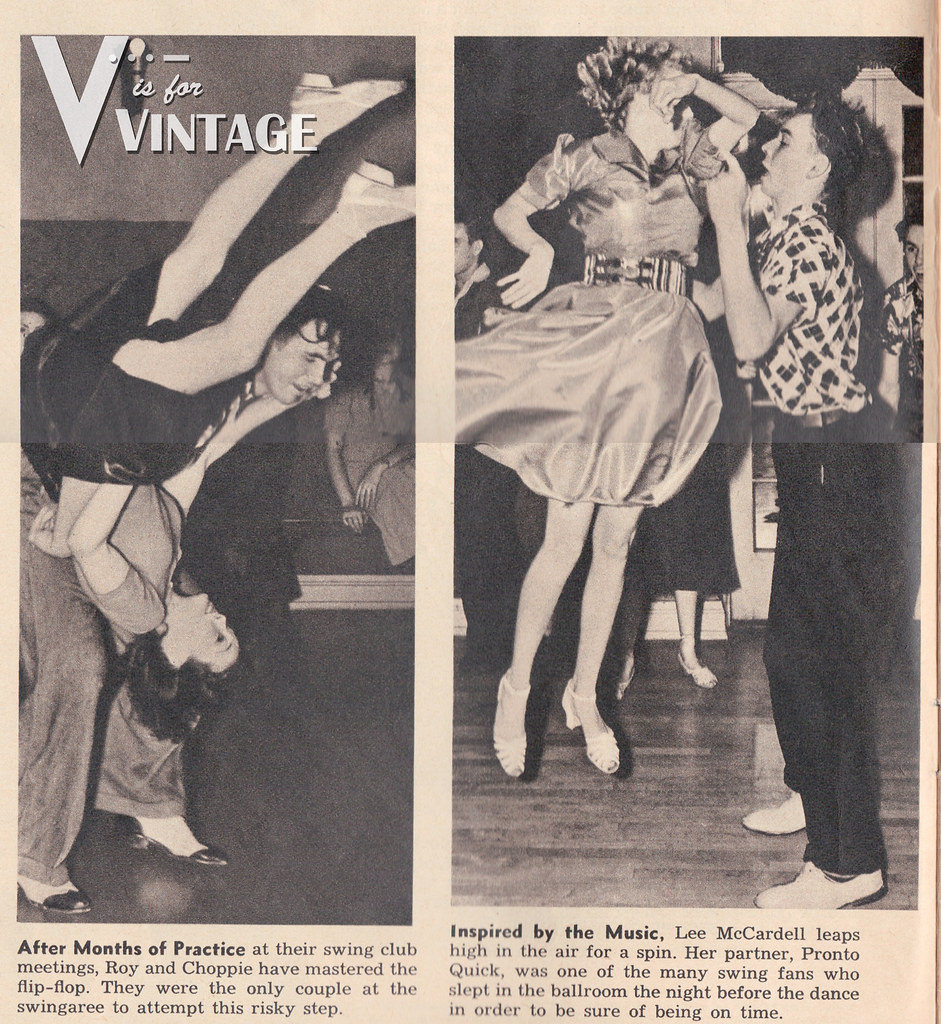
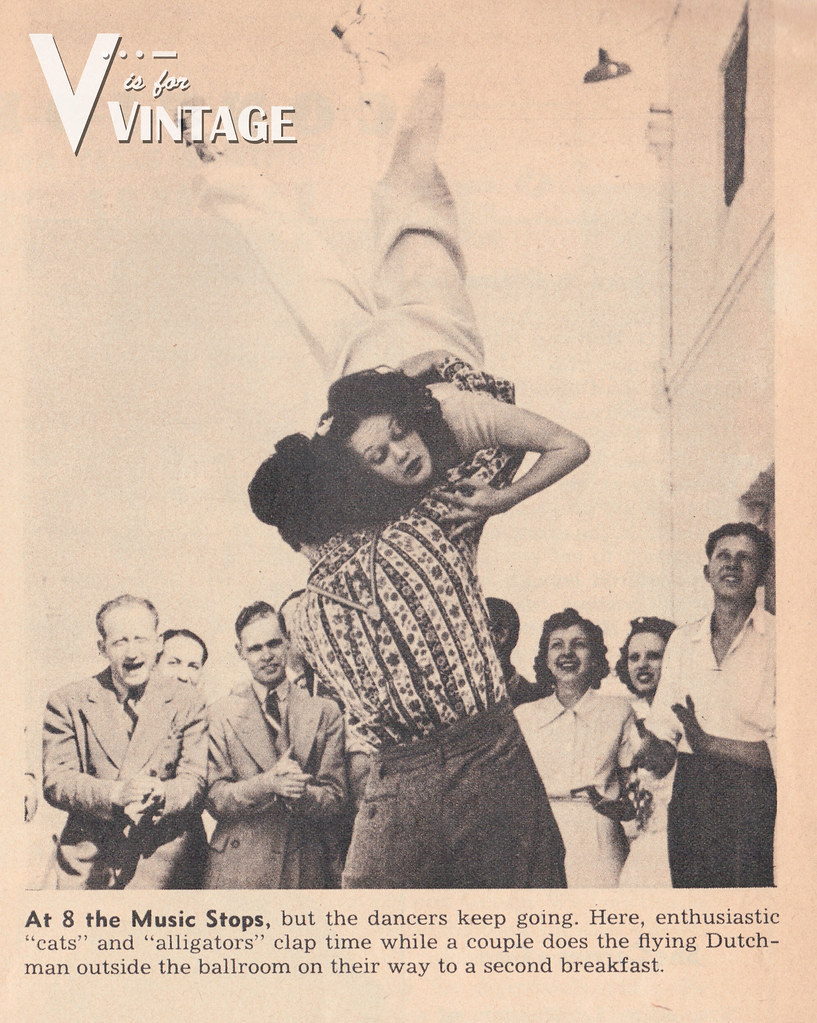
In honor of last week's post about the Balboa Rendezvous, I thought I'd share a 1938 Look Magazine article with you about some of the incredible dancing that used to take place there! The Rendezvous Ballroom was huge, roughly 1 city block wide and 1 city block long - but I think 5,000 kids in there would still have been crowded! No wonder they could only dance chest to chest. :)

5,000 Young Californians Rise at Dawn for a... 
6 A.M. SWING PARTY

On June 18 in Balboa, Cal., the amazing swing music fad in the U.S. hit a new high. On that day some 5,000 "cats" and "alligators" rose at dawn to "cut rugs" and "kick out" at 6 o'clock in the morning. The occasion was a "jam session" or "swingaree" staged by radio station KEHE to celebrate the end of the school year.
The night before the party, "ickies" and "jitterbugs" started arriving. Many came in parties composed of members of local swing clubs. Most of them came by car, some by foot. One young man drove 396 miles from Tonopah, Nev. One came on crutches.
From 6 to 8 in the morning, the ballroom of the Balboa Rendezvous shook with their dancing of the Big Apple, the Varsity, the Suzie-Q while the orchestra and a phonograph "gave out" with "licks" and "solid senders."


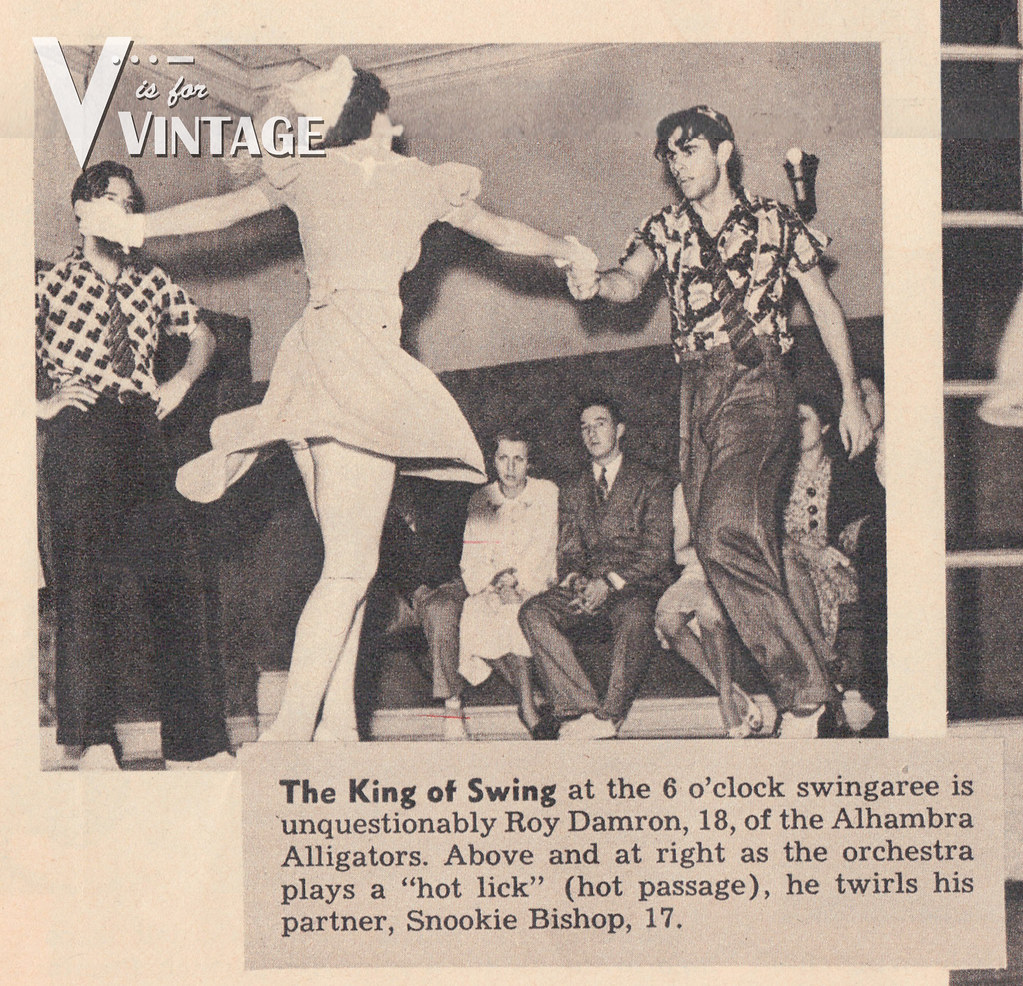
Those shirts! Those ties! So terrible, and so AWESOME!


Dancing in a hat and gloves...but no stockings. Those wild jitterbugs!


This photo has been one of my personal favorites since I was 16 years old - 
I wanted to be her SO badly.
Still do. :)

Monday, March 21, 2011

Modern Swing Fashion

Back in the late 90s when I started swing dancing, vintage style was all the rage - high-waisted pants, gabardine skirts, the aforementioned long-sleeve blouses...it wasn't enough to dance awesome, you also had to look the part.

Then the popularity of the vintage clothes waned - they're expensive, fragile, and it's hard to make or buy decent repros. Much to the chagrin of club promoters and brides-to-be, jeans and t-shirts were common at even the fanciest events and biggest competitions.

The last couple of years I've seen a real upswing (hehheh - no pun intended) in swing fashions. I chalk this up to 2 causes: among instructors there's a new emphasis on performing choreographed routines, so costuming is being considered more, and the emerging Balboa dance culture prides itself on being Refined instead of Raw. I'm loving it - what you wear has a huge impact on how you move, so dressing the part can actually make you a better dancer!

A couple weeks ago we went to the Saturday night portion of Inspiration Weekend and saw the 30-Second Showcase. This is a competition designed for non-professionals to get their feet wet with choreographing and performing a routine - the dancing was great, but I was really impressed with some of the outfits! So many competitors managed to put together looks that were coordinated without being cheesy, using modern clothes that are dance friendly. I hope to see more of this! :)

All photos used with permission. To see more, please visit BHousePhoto.com
Celina Avila and Jason Le

Morgan Day and Emily Wigger

Michael Seibert and Virginia Zachary

Jack Chen and Brittany Calavitta

 Michael Seibert and Virginia Zachary


Thursday, March 17, 2011

Pattern Review: 30's Trousers from Wearing History

Over the last couple of weeks things have finally started calming down and I've managed to squeeze in some personal sewing time. I've known for months what my next project was going to be - I've been desperate to try Wearing History's pattern for mid-30's trousers - how cute is this?!

Smooth Sailing by Wearing History

I'm a tad bit obsessive about fit (I've been known to sew while in my skivvies so that I can try on the garment every 30 seconds) so I figured my first pair would just be a mockup and I'd have to tweak the pattern for the real one. This was one time I was GLAD to be wrong! ;) Lauren did such a great job updating the original pattern that I only needed minor tweaks. 30's & 40's trousers are notorious for low crotches and shapeless legs, but she's done a great job of adjusting this pattern in all the right ways.

In addition, this pattern has all new instructions - a vast improvement over vintage sewing instructions! No need to fear if you're still learning how to sew.

The only change I made to these was shortening the front & back rise 1" (I'm shortwaisted and the waistband was creeping up my ribcage). Seriously. The ONLY change. Awesome. Look how cute!

(I think Chris is making shadow puppets on me in the Back view)

I found some bluish-gray checked fabric on sale at Jo-anns - it's a poly-rayon blend, so it's machine washable but still drapes nicely. I think next time I'll do a lightweight denim or chambray - I want to be just like the pattern cover!

A few notes:
The waistband is snug, so if you're in between sizes, go up.
The hips and thighs are cut full, so if you're larger on the bottom, no worries. If you've got slim thighs, I hate you you might want to cut a smaller size through the leg.
I skipped the belt loop template and just stitched them on where they looked nice.
I hemmed them slightly shorter than the pattern because I hate getting caught up in cuffs.

Thursday, March 10, 2011

70s does 30s Blouse - New and Improved!

As a swing dancer, I'm always on the lookout for vintage-y pieces that aren't precious real stuff. Silky blouses with flowy long sleeves are one of the hardest garments to find and are highly coveted among my friends. We get our inspiration from these dancers, among others:
Whitey's Hopper Maniacs, better known as Whitey's Lindy Hoppers

So every time I see a 70's necktie blouse with lovely gathered yokes, pintucks, bright colors and bold prints, I'm sad that it looks so darn 70's! They're affordable, sturdy, and cute. But the necktie just won't work.


A couple weeks ago I needed a "shiny shirt" for a performance, and rather than risk wearing real vintage I pulled out this F21 blouse from the pile and attempted some Swing Era Transplant Surgery!

Here's the steps in case you want to try:

Put the blouse and mark the new collar. (My seamline is marked with the blue pins on the viewer's right.) Try it both buttoned up and unbuttoned. I went as wide & long as I thought I could get away with!


Mark your edgeline (where your pins were). If you're smart, use disappearing ink or chalk. I'm not smart and usually use a Sharpie cause it's handy, so I made tiny dots...hope you can see! Your lines should be more or less straight - no need to curve the collar tip.

Transfer markings to the opposite side.

Staystitch a line 1/8" inside your edge to stabilize the layers.

Carefully cut along your edgeline, and apply Fray-Check if needed.

Grab your trim, swap out the thread colors on the machine if needed (I changed to black on top and white in the bobbin), and apply trim along the entire collar edge to cover your raw edge.

If your trim is double sided (like rickrack) you can just fold it back at the corner instead of trying to turn the corner - it's a tight corner, so it's worth finding doublesided trim!

My project's a little messy, but that's not visible unless you're photographing it on macro. :)

Here's the finished product - I love how the contrasting trim highlights my new collar!

If you try this project, send me a link or a picture - I'd love to see!
Related Posts Plugin for WordPress, Blogger...